
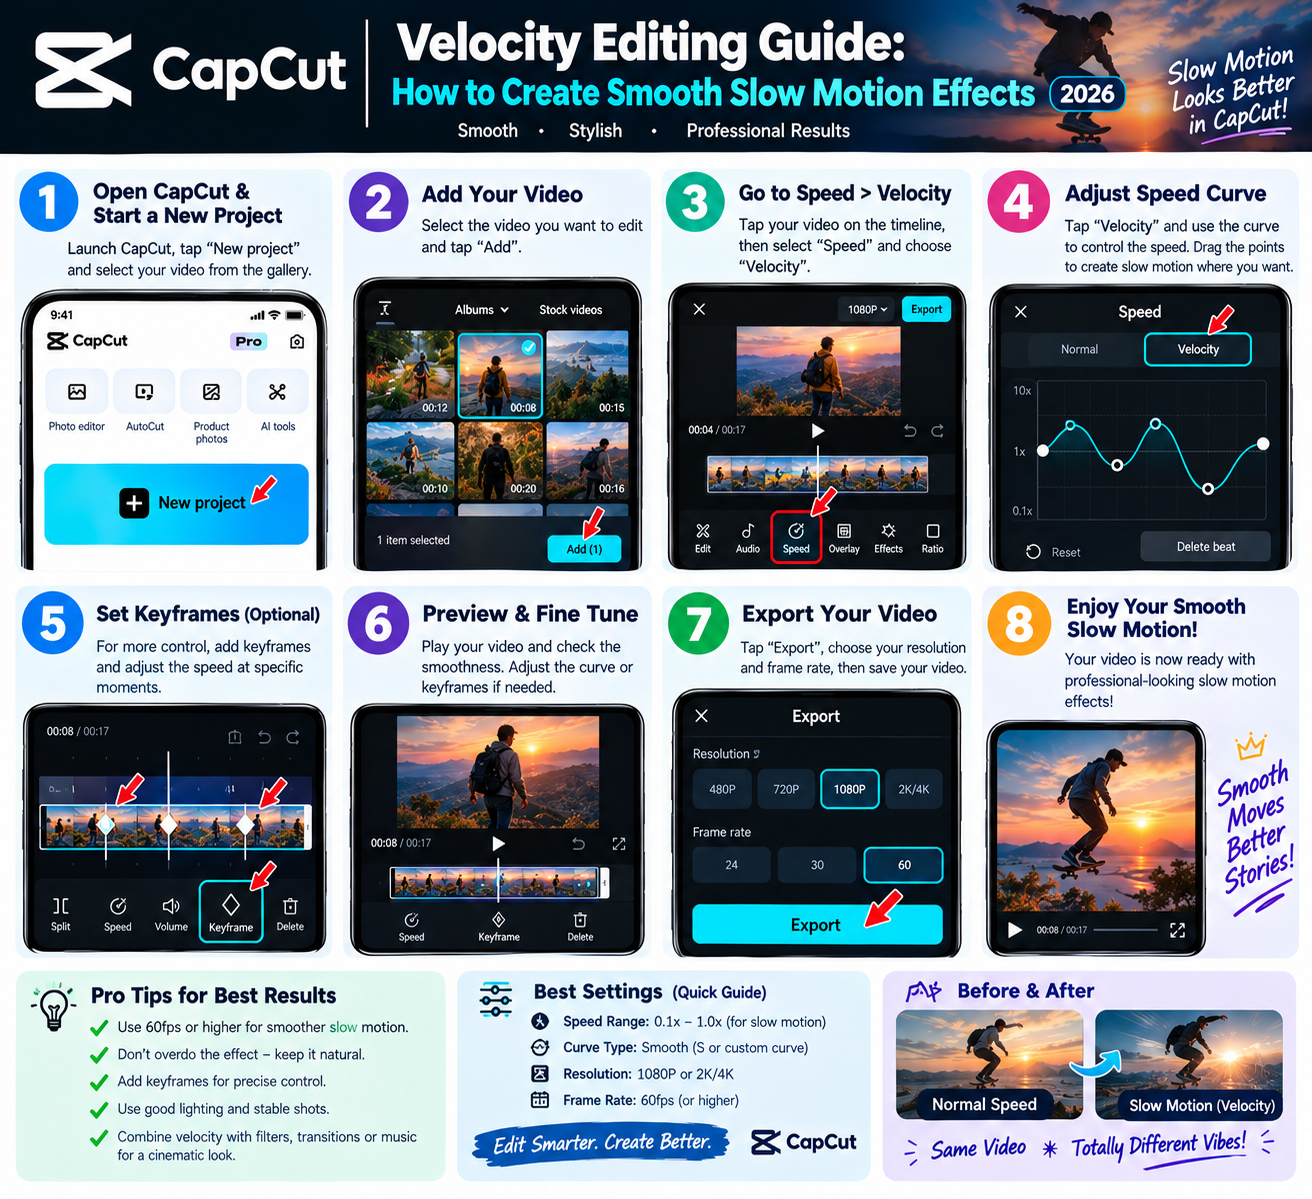
CapCut Velocity Editing Guide: How to Create Smooth Slow Motion Effects (2026)
Ever been scrolling through TikTok, Reels, or Shorts and gotten completely hooked by a video where the action speeds up and slows down perfectly in time with the music? Maybe it’s a clutch PUBG Mobile moment, a dramatic car edit, a dance sequence, or a cinematic travel clip — that eye-catching effect has a name, and it’s called a capcut velocity edit.There was a time when pulling off a velocity edit like that meant you had to be a professional editor working in something like After Effects, using plugins like Twixtor, or grinding away in DaVinci Resolve. You’d manually keyframe time remapping, mess with frame interpolation settings, and then sit through hours of rendering just to see if it worked.Fast forward to 2026, and CapCut — ByteDance’s app — has pretty much changed all of that. Between built-in speed curve controls, smart AI beat detection, and proper Optical Flow frame generation, basically anyone with a phone or a laptop can put together buttery-smooth slow motion in a matter of minutes.In this guide, we’re going to go through everything you need to actually pull off viral-worthy velocity edits in CapCut — audio beat mapping, custom speed curves, the frame rate physics behind it all, dynamic motion blur, capcut velocity editting and the finishing touches that separate a decent edit from a great one, on both CapCut Mobile and CapCut PC.
The Physics of Smooth Capcut Velocity: Why Most Edits End Up Looking Choppy:
Before we even open the app, let’s talk about something almost every beginner runs into at some point — choppy, stuttering slow motion that just doesn’t look right.
You’ve got a great clip, you drop it into CapCut velocity editting , slow it down to 0.1x, and suddenly it looks like a laggy slideshow instead of smooth cinematic motion. So what’s actually going on here?
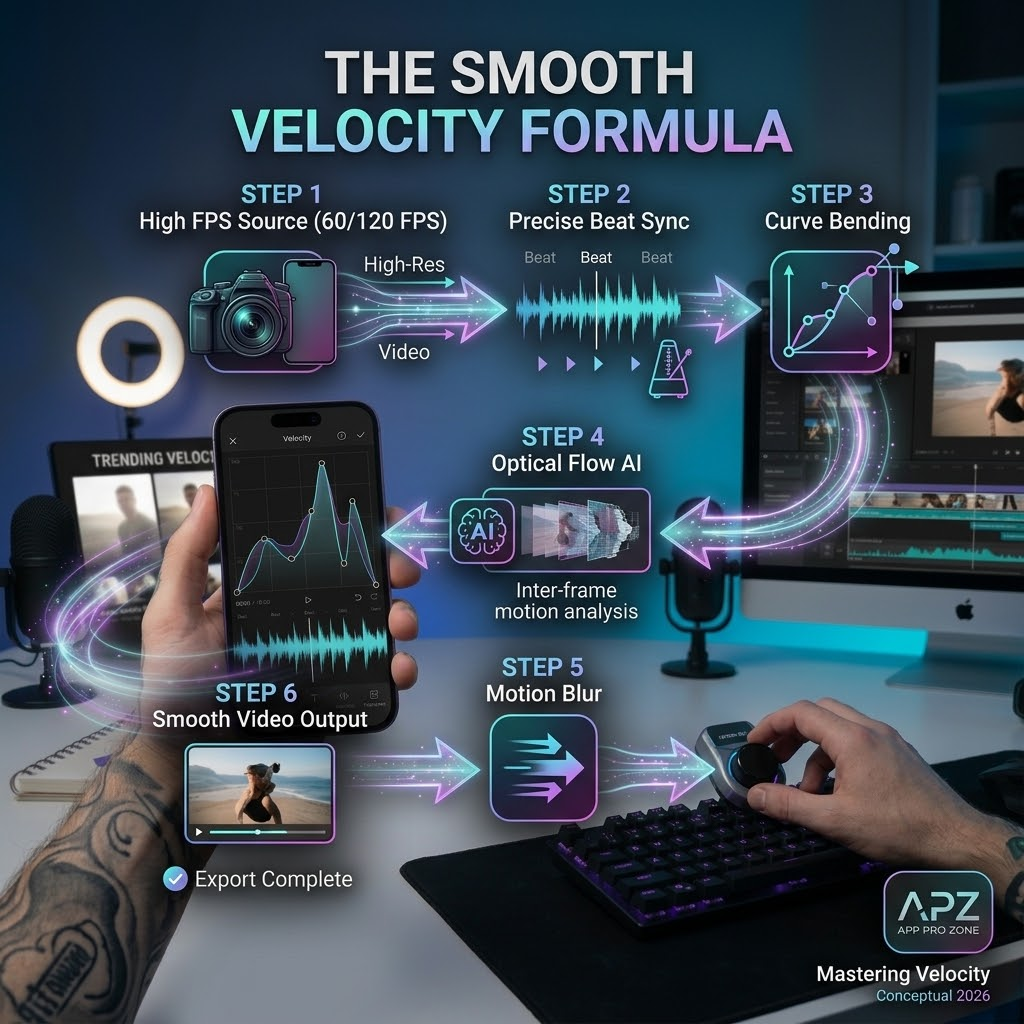
The secret really comes down to three core concepts: Frame Rate (FPS), Frame Interpolation (Optical Flow), and Bezier Acceleration.
1. Source Frame Rate (FPS):
When you shoot a normal video on your phone, it’s usually recording at 30 frames per second. That means every single second of footage is actually made up of 30 individual still images played back one after another, fast enough that it looks continuous.
Now if you take a 1-second clip shot at 30 FPS and slow it down to 0.1x, you’re stretching those same 30 frames across a full 10 seconds. That leaves you with only 3 frames playing every second — and your eyes catch those gaps immediately, which is exactly why the footage ends up looking jittery and broken instead of smooth.
But if you’d recorded at 60 FPS, 120 FPS, or even 240 FPS instead, CapCut has two, four, or eight times as much actual visual data to work with when stretching that footage out — which is what keeps the motion looking fluid instead of choppy.
2. Optical Flow (AI Frame Generation):
So what happens if your footage was only shot at 30 FPS to begin with? That’s where Optical Flow comes in and basically saves your edit. Rather than just duplicating existing frames to fill the gap — which is exactly what causes that stuttery look — Optical Flow uses AI to look at the motion happening between Frame A and Frame B, and actually generates brand new frames in between from scratch. It’s essentially faking a higher frame rate by filling in the visual information that was never actually captured.
3. Bezier Speed Curves:
A speed change that happens instantly — jumping straight from 1x to 0.1x with zero transition — tends to feel jarring and mechanical. What actually makes a velocity edit feel smooth is a curved speed change: starting fast, easing gradually down into that dramatic slow-motion moment, then smoothly accelerating back up to normal speed again.
Phase 1: Pre-Production and Getting Your Audio Ready:
A good velocity edit actually starts before you’ve even opened the speed editor. Honestly, most of the emotional impact of these edits comes down to how tightly the speed changes line up with the music.
Step 1: Shoot or Capture Footage at a High Frame Rate:
Camera footage: go into your phone’s camera settings and switch video recording to 1080p at 60 FPS, or 4K at 60 FPS if your phone supports it. If there’s a dedicated slow-motion mode (120 FPS or 240 FPS), use that for any action shots specifically.
Game screen recordings: if you’re pulling clips from games like PUBG Mobile, Call of Duty, or Free Fire, set your in-game graphics to Smooth + Extreme (60 FPS) or bump it to 90/120 FPS if the game allows it, and make sure your screen recorder itself is set to capture at 60 FPS with a decent bitrate.
Step 2: Importing Your Media and Letting CapCut Detect the Beats:
- Open CapCut and start a new project.
- Import your video clip.
- Tap Add Audio below the main video track, or bring in your own sound file.
- Tap on the audio track to select it, then tap the Beats icon (it looks like a small drum) in the bottom toolbar.
- Tap Auto Generate and pick either Beat 1 or Beat 2. CapCut will scan the audio and drop yellow marker dots wherever it detects a strong drum hit or bass drop.
A quick tip here — auto-beat detection works reasonably well, but if you want cleaner results on a specific track, it’s worth doing it manually instead. Just listen to the song in real time and tap + Add Beat right where the snare hits or the vocal drops land.
Phase 2: Building Capcut Velocity Edits on CapCut Mobile:
If you’re editing on an Android phone or iPhone, CapCut’s capcut velocity edit touch controls actually make speed mapping pretty quick and intuitive once you get a feel for where everything is.
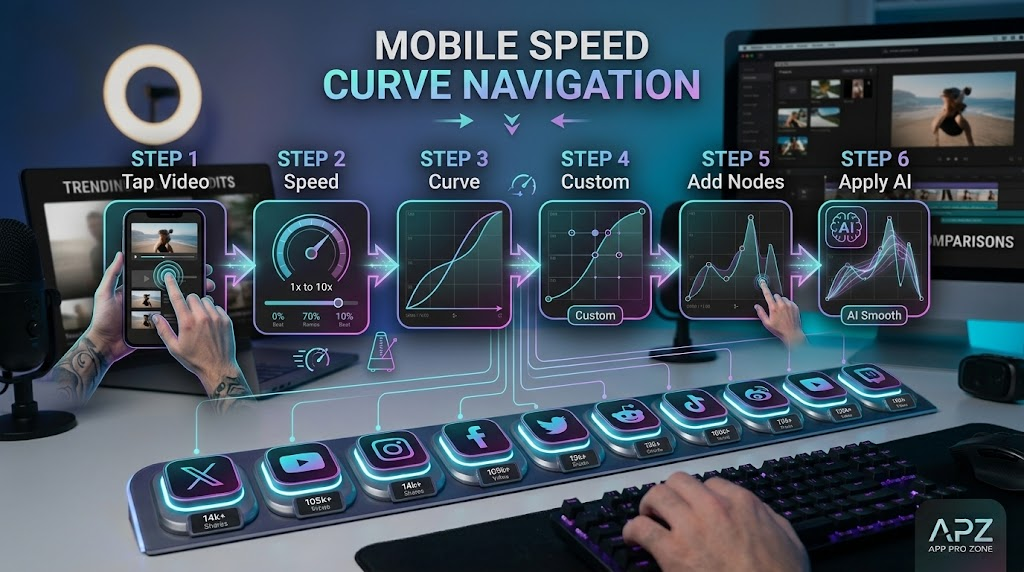
Step 1: Splitting Clips at Your Audio Markers:
- Scroll along your timeline and stop the playhead right on top of the first yellow beat marker on the audio line.
- Select your video clip and tap Split (✂).
- Go through the rest of the yellow markers doing the same thing. By the end of this, you’ll have a bunch of small clips lined up directly with the rhythm of the track.
Step 2: Opening the Custom Speed Curve:
- Select one of your newly split micro-clips on the timeline.
- Tap Speed in the bottom menu.
- You’ll see two options here — Normal and Curve. Go with Curve.
- Tap Custom, then tap Edit.
- Step 3: Actually Shaping the Velocity Graph
- You’ll be looking at a graph with five round control nodes on it:
- Drag a node UP and it speeds playback up (anywhere from 2.0x up to 5.0x).
- Drag a node DOWN and it slows things down (typically between 0.1x and 0.5x).
- For that classic “fast-to-slow” viral look:
- Push the first node UP to around 3.0x.
- Pull the second node DOWN to about 0.2x.
- Line up that lowest dip in the curve exactly with the key moment in your footage — a gunshot, a jump, a dance hit, whatever the highlight is.
- Bring the third node back UP to somewhere around 1.5x–2.0x.
Step 4: Turning on Optical Flow for Smoother Slow-Mo:
- Before you back out of the Curve editor, look down in the bottom-left corner:
- Tap Make it smoother.
- Choose Better Quality (Optical Flow) rather than Faster.
- Tap the checkmark. CapCut velocity editting will then show a progress bar while its AI works out and generates the missing frames.
Phase 3: Building Velocity Edits on CapCut PC (Desktop Workflow)
Mobile editing is great when you just need to knock something out quickly, but working in CapCut velocity editting PC gives you a lot more precision on the timeline, better visibility across multiple layers, and GPU hardware acceleration that renders Optical Flow noticeably faster than doing it on your phone.
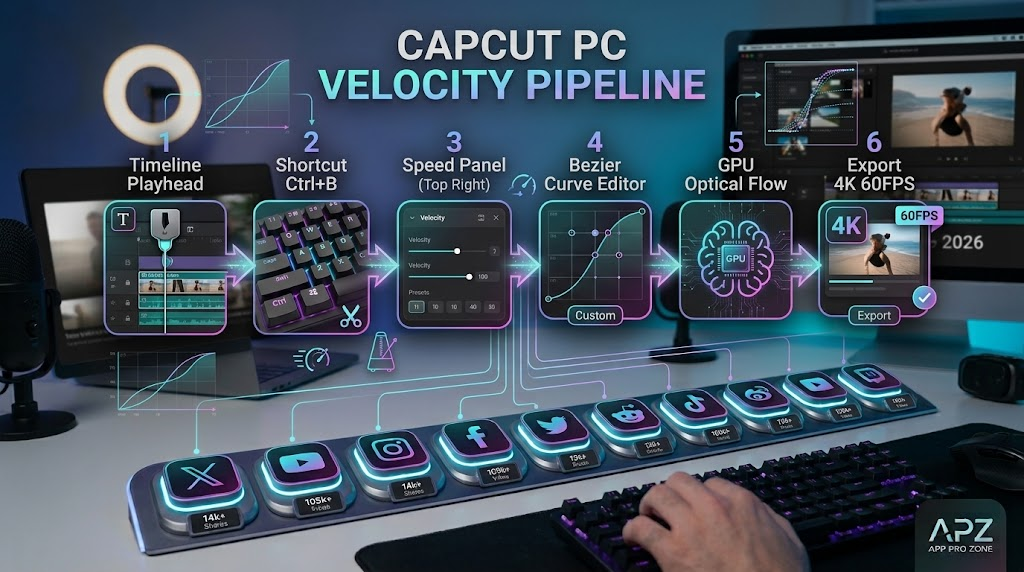
Step 1: Keyboard Shortcuts for Faster Editing:
- Bring your raw video and audio into the Media library in the top-left corner, then drag both down onto the multi-track timeline.
- Select your audio track and, while it’s playing, hit Control + M on Windows (or Command + M on macOS) to drop manual yellow beat markers right where you want them.
- Use Ctrl + B to instantly slice your video clip at each beat marker — way faster than manually clicking the split button over and over.
Step 2: Using the Desktop Curve Editor in the Inspector:
- Click on a video segment on your timeline.
- Head over to the Inspector panel on the top right and click the Speed tab.
- Switch from Normal to Curve.
- Click Custom — this opens up a full graph where you can grab and drag control nodes directly with your mouse.
- Pull on the Bezier handles extending from each node to round out the curve, turning those harsh, sudden speed jumps into a smoother acceleration.
Step 3: Letting Your GPU Handle Optical Flow:
- In that same Speed panel inside CapCut velocity editting PC, scroll down until you find Smooth Slow-Mo.
- Check the box and select Optical Flow.
- Because CapCut PC actually uses your computer’s dedicated graphics card for this, it can generate all those interpolated frames without your preview lagging or the app crashing on you — something that’s a lot more likely to happen on mobile.
Phase 4: Adding the Professional Touches — Motion Blur, Flash Effects, and Color Grading:
Getting the speed ramps right is really only about 70% of the job. If you want the edit to actually feel alive, energetic, and polished, you need to layer in a few complementary visual effects on top of that.
VISUAL POLISHING LAYER OVERVIEW
LAYER 1: Video Track with Optical Flow Speed Curves
LAYER 2: Motion Blur Effect (Blur: 30%, Blend: 40%)
LAYER 3: White Flash Overlay on Beat Drops (Opacity Keyframes)
LAYER 4: High Contrast / Sharpness Adjustment Layer
1. Adding Realistic Motion Blur:
- When a clip suddenly accelerates from 0.1x slow motion up to 5x, your eyes naturally expect to see some blur there — that’s just how fast motion actually looks. Adding a bit of motion blur into that acceleration is what makes it feel organic instead of jarring.
- Method 1 — the built-in Motion Blur tool: select your clip, scroll down to Motion Blur in the main toolbar, and set Blur somewhere around 30–40% with Blend at 40%. Pick Once or Twice depending on the directionality you want.
- Method 2 — through the Video Effects layer: tap Effects > Video Effects > Lens, then select Motion Blur. Place this effect on its own track directly above the fast-acceleration points in your clip.
2. Building Beat Flash Overlays:
- A quick white flash right on every major beat drop adds a surprising amount of energy to gameplay clips and dance edits:
- Tap Overlay > Add Overlay.
- Pick a solid white clip from CapCut’s Stock Videos library.
- Pinch and stretch it so it fully covers the screen canvas.
- Trim it down to something short — around 0.1 to 0.2 seconds.
- Tap Splice / Blend and select either Overlay or Color Dodge.
- Set a keyframe at the very start of the overlay with 100% opacity, and another at the end with 0% opacity. That’ll make the white flash fade out almost instantly, giving you a clean strobe hit right as the slow motion kicks in.
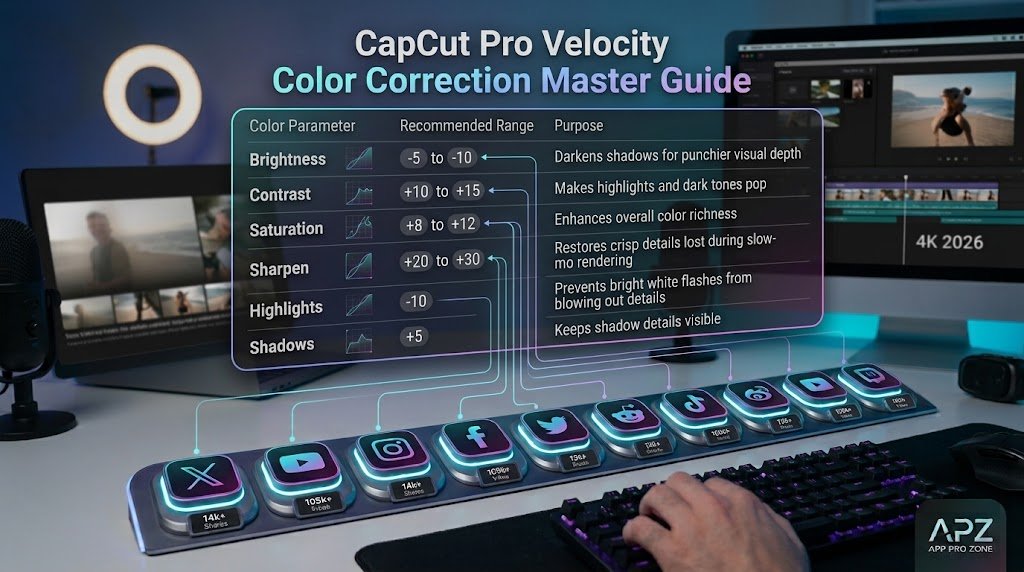
3. Color Grading Guidelines for Velocity Edits
Capcut velocity edits tend to look their best with a bit of extra contrast, crisp highlights, and punchier saturation than you’d normally use. Here are some baseline settings to start from:
Troubleshooting Common Velocity Editing Issues:
| Issue | Root Cause | Solution |
| Slow motion looks choppy and jittery | Source clip shot at 30 FPS without AI frame interpolation. | Open Speed settings and enable Smooth Slow-Mo > Optical Flow. |
| Audio sounds distorted or high-pitched | Pitch shifted when altering playback speed. | Ensure the Keep Pitch toggle is checked inside the Speed settings tab. |
| Video and audio fall out of sync | Splitting video segments shifted their timeline positioning. | Use Beat Markers as visual guides and avoid dragging clip edges without snapping enabled. |
| CapCut crashes during Optical Flow render | Mobile device ran out of temporary RAM memory. | Lower preview playback quality, clear CapCut app cache, or move the project to CapCut PC. |
Best Export Settings for Social Media:
Because capcut velocity edits are packed with constant motion shifts, exporting with the wrong compression settings usually leads to blurry, pixelated results once you upload to TikTok or Instagram — those platforms compress your video hard on their end, so you want to give them the cleanest possible source file to begin with.
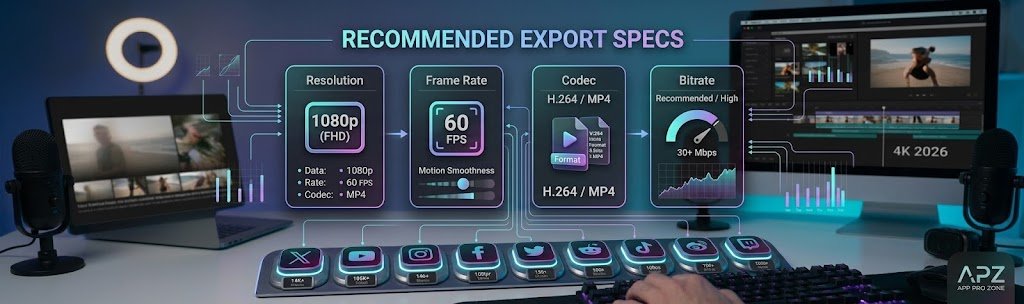
When you get to the export screen for your finished edit, here’s what to set:
Resolution: 1080p (1080×1920). Exporting in 4K really isn’t necessary for vertical feeds — if anything, it just means TikTok and Reels compress it harder on their end anyway.
Frame Rate: 60 FPS. This one actually matters a lot — if you export at 30 FPS, you basically throw away all that smoothness you just built using Optical Flow.
Format/Codec: MP4 with H.264 encoding, since that’s what plays nicest across every social platform.
Bitrate: Set it to Higher, or if you’re on PC, go with a custom bitrate around 30–45 Mbps so you don’t end up with blocky artifacts during those fast velocity transitions.
Mastering a CapCut velocity editting:
Mastering a CapCut velocity edit is one of the best ways to create trending short-form videos today. Whether you want to learn mobile CapCut velocity editing or work on desktop, making a smooth CapCut velocity edit requires precise timing. With modern AI tools, every CapCut velocity edit becomes much easier to sync with complex audio beats. If you are struggling with stuttering footage during a CapCut velocity edit, using Optical Flow frame generation will elevate your CapCut velocity editing to professional standards. Many creators prefer using speed curves for a CapCut velocity edit because it offers complete control over acceleration points. By practicing CapCut velocity editing techniques regularly, your custom CapCut velocity edit projects will look far more polished. Furthermore, applying motion blur to a CapCut velocity edit creates a dynamic visual impact, proving that high-quality CapCut velocity editing can truly transform basic raw clips into viral content.
Final Thoughts
Making viral capcut velocity edits in CapCut really isn’t about memorizing a bunch of complicated tools — it’s more about training your eyes and ears to work together. Once beat alignment, speed curve shaping, and Optical Flow interpolation click for you, turning a plain raw clip into something eye-catching and full of energy only takes a few minutes.
Play around with different curve shapes, don’t skip the motion blur, and always shoot at 60 FPS from the start if you want the cleanest results possible.